Features
Agents
An autonomous coding agent that runs inside the IDE without interrupting your workflow. It handles
multi-step tasks, manages its own working memory, spawns specialized sub-agents, and respects
per-project approval policies configured in a JSON file at the workspace root.
Opening Agents
Press Cmd+Alt+A / Ctrl+Alt+A, or
click the Agents item in the sidebar. The panel shows the current task, working memory state,
active sub-agents, and the action history.
How the agent works
The agent hooks into the IDE's stream state non-invasively — it does not modify the core
editor loop. When you give it a task, it breaks it into steps, uses tools to read the codebase,
makes edits, runs terminal commands, and iterates until complete. The agent pauses for approval at each
action if configured to do so.
Working memory
The agent maintains a working memory across multi-step tasks within a session. This lets it
track what it has already done, which files it has modified, and what remains — without you needing to
re-explain context between steps.
Auto-approval tiers
Each action type has an independent approval tier. Tiers are set globally in NeuralInverse
Settings and can be overridden per project in the
.neuralinverseagent file.
auto |
— |
Action executes immediately without any prompt. |
ask |
— |
IDE shows a confirmation prompt before each action of this type. You can approve, reject, or ask the agent to try a different approach. |
block |
— |
Actions of this type are never executed. The agent skips them or reports that it cannot complete the step. |
Sub-agents
The main agent can spawn sub-agents to parallelize work. Each sub-agent gets its own
isolated chat thread and a scoped tool whitelist based on its role.
Explorer
Read-only. Scans the codebase, searches symbols, reads files, builds context summaries for the main agent. Cannot write files or run terminal commands.
Editor
Scoped file writes. Edits only within its assigned file set. Full tool whitelist is enforced per instance — it cannot access files outside its scope.
Verifier
Runs tests, lint checks, and build commands. Read and execute only — cannot modify any source files. Reports pass/fail back to the main agent.
Multiple sub-agents run concurrently up to the maxConcurrentSubAgents
limit. Excess sub-agents queue and launch as capacity frees. Configure the limit in the
.neuralinverseagent file.
Features
Modernisation
End-to-end codebase migration in the IDE. Modernisation handles discovery, dependency resolution,
AI-assisted translation, and compliance-gated cutover across 4 sequential stages. It opens as a
dedicated auxiliary window so the migration runs alongside your normal editor.
Opening Modernisation
Press Cmd+Alt+M / Ctrl+Alt+M. The window
opens alongside your editor. From the idle screen you can create a new migration session or resume an
existing one.
Creating a session
Click New Migration. The setup wizard asks for:
- Source project(s) — the codebase to migrate from. Add one or more folders depending on
your migration topology.
- Target project(s) — the destination codebase. Can be an existing project or an empty
folder for a fresh start.
- Migration pattern — choose from 30+ built-in presets or enter a custom pattern.
The pattern determines which language pair profiles, idiom mappings, and topology rules are applied.
Once configured, click Start Discovery to begin Stage 1.
Stage 1 — Discovery
Discovery scans both source and target projects concurrently with 8 parallel workers per
project. It does not call the LLM — everything in this stage is static analysis.
- Language detection — 40+ file extensions including COBOL, JCL, RPG, PL/SQL, and all
major modern languages. Shebang parsing and content heuristics for ambiguous files.
- Unit decomposition — COBOL paragraphs, Java/Kotlin/Scala classes, Python functions,
C# methods, Go functions, Rust items, PL/SQL procedures.
- Dependency graph — raw import extraction across 16 languages, resolved into a
directed dependency edge graph used for scheduling in later stages.
- Project metadata — build system (Maven, Gradle, npm, Cargo, Go modules, pip, etc.),
50+ framework patterns, CI/CD config, Docker detection.
Discovery completes in seconds for most projects. Results are shown as a breakdown of
languages, units, dependencies, and risk scores before you proceed to planning.
Stage 2 — Planning
Planning generates an AI-assisted migration roadmap based on the discovery results. It runs
one LLM pass over the project metadata and dependency graph to produce a structured plan.
- 7-phase roadmap — Foundation → Schema → Core Logic → API Layer → Integration →
Compliance → Cutover. Each phase has a list of units, estimated effort, and dependencies.
- CPM critical path — the plan identifies the critical path through the dependency
graph and flags 12 types of blockers (circular deps, API compatibility breaks, schema changes, etc.).
- AI supplement — you can add notes or constraints before the plan is generated. The
AI incorporates them into the roadmap.
Plan approval gate
Stage 3 (Translation) is locked until you explicitly click Approve Plan. Migration
cannot begin without sign-off. Review the roadmap and blocking issues before approving.
Stage 3 — Translation
Translation converts each source unit to the target language using the AI. Units are
processed in leaf-nodes-first order — dependencies are translated before the units that depend on them.
Source resolution
Before translating a unit, the engine inlines its dependencies directly into the source
to give the AI full context. This is language-specific:
- COBOL — COPYBOOK expansion
- PL/SQL — %TYPE and %ROWTYPE inline substitution
- RPG — /COPY and /INCLUDE expansion
- Natural — INCLUDE and CALLNAT resolution
- Java — @EJB and @Autowired context injection
- TS/JS, Python, Go, Rust, C#, VB, Kotlin, Scala — generic import resolution
Language pair profiles
11 built-in profiles with idiomatic mapping tables. COBOL → Java includes 32 explicit
idiom mappings (PERFORM → method call, WORKING-STORAGE → fields, etc.). Custom profiles can be added
by entering a free-form migration pattern.
Verification
Every translated unit is checked before being written to the knowledge base:
- Blocking — non-empty output, no placeholder text, no truncation
- Warnings — source language keywords in output, unbalanced braces, length sanity
Units that fail blocking checks are retried. Decisions raised during translation
(type mismatches, missing equivalents, ambiguous patterns) are recorded and surfaced for review.
Stage 4 — Cutover
Cutover writes all translated files to the target project and produces an audit record.
Before you can approve cutover, 4 blocking readiness checks must pass:
- All units translated successfully
- No unresolved blocking decisions
- No critical dependency cycles in translated output
- Target project writable
On approval, the commit writer iterates over all translated units and writes
unit.targetText to unit.targetFile via the IDE file
service. An audit bundle is exported with a FNV-1a bundle hash and chain integrity verification —
producing a compliance-ready record of the entire migration.
Migration patterns
30+ built-in presets are available. Common ones:
- COBOL → Java, COBOL → TypeScript, COBOL → Python
- PL/SQL → TypeScript, PL/SQL → Python
- RPG → Java, Natural → Java
- Angular 1 → Angular 18, React 17 → React 18
- Spring Boot 2 → Spring Boot 3, Java 8 → Java 21
- jQuery → React, jQuery → Vue
Any source and target language combination can be entered as a custom pattern —
the AI uses it to select the closest built-in profile and supplements with general translation knowledge.
Features
Firmware
An AI-native embedded development environment built into the IDE. Hardware specifications, register maps,
timing constraints, silicon errata, and compliance rules are loaded directly into the AI context — so
every chat, Power Mode session, and agent tool call is hardware-aware from the moment a session is open.
Opening Firmware
Press Cmd+Alt+F / Ctrl+Alt+F. The
Firmware window opens as an auxiliary window alongside the editor. Tabs across the top provide access
to MCU, Registers, Datasheets, Build, Flash, Serial, Debug, and Compliance views.
Project auto-detection
When you open a workspace, NeuralInverse scans for firmware project markers and assigns
a confidence score. A score above 0.5 triggers automatic session suggestion.
- platformio.ini — PlatformIO project (confidence: 0.9)
- .ioc file — STM32CubeMX project (confidence: 0.9)
- sdkconfig — ESP-IDF project (confidence: 0.85)
- prj.conf — Zephyr project (confidence: 0.85)
- Cargo.toml with embedded crates — Rust embedded (confidence: 0.8)
- CMakeLists.txt / Makefile / .ino — generic embedded (confidence: 0.6)
- Firmware.inverse — explicit manifest, always confidence 1.0
Auto-detection also extracts the MCU variant, board name, RTOS, build system, HAL/framework,
compliance frameworks, SVD paths, and datasheet paths from the detected config files.
Selecting an MCU
The MCU tab shows the active MCU and a search box. Type a part number, family name, or
board name to search across all 357 variants. The search is fuzzy — entering f4
returns all STM32F4 variants, esp32s3 returns ESP32-S3 variants.
STM32 (all families)
F0/F1/F2/F3/F4/F7/H7/L0/L1/L4/L5/G0/G4/U5/WB — Cortex-M0 through M33
Nordic nRF
nRF52 series, nRF53 series, nRF91 series — Cortex-M4/M33
ESP32 family
ESP32, ESP32-S2/S3, ESP32-C3/C6, ESP32-H2 — Xtensa / RISC-V
RP2040 / RP2350
Raspberry Pi microcontrollers — dual-core Cortex-M0+
NXP, Renesas, TI
i.MX RT, S32K, RA/RX/RL78, MSP430, CC series
Others
Infineon XMC/PSoC, Silicon Labs EFM32, GigaDevice GD32, and more
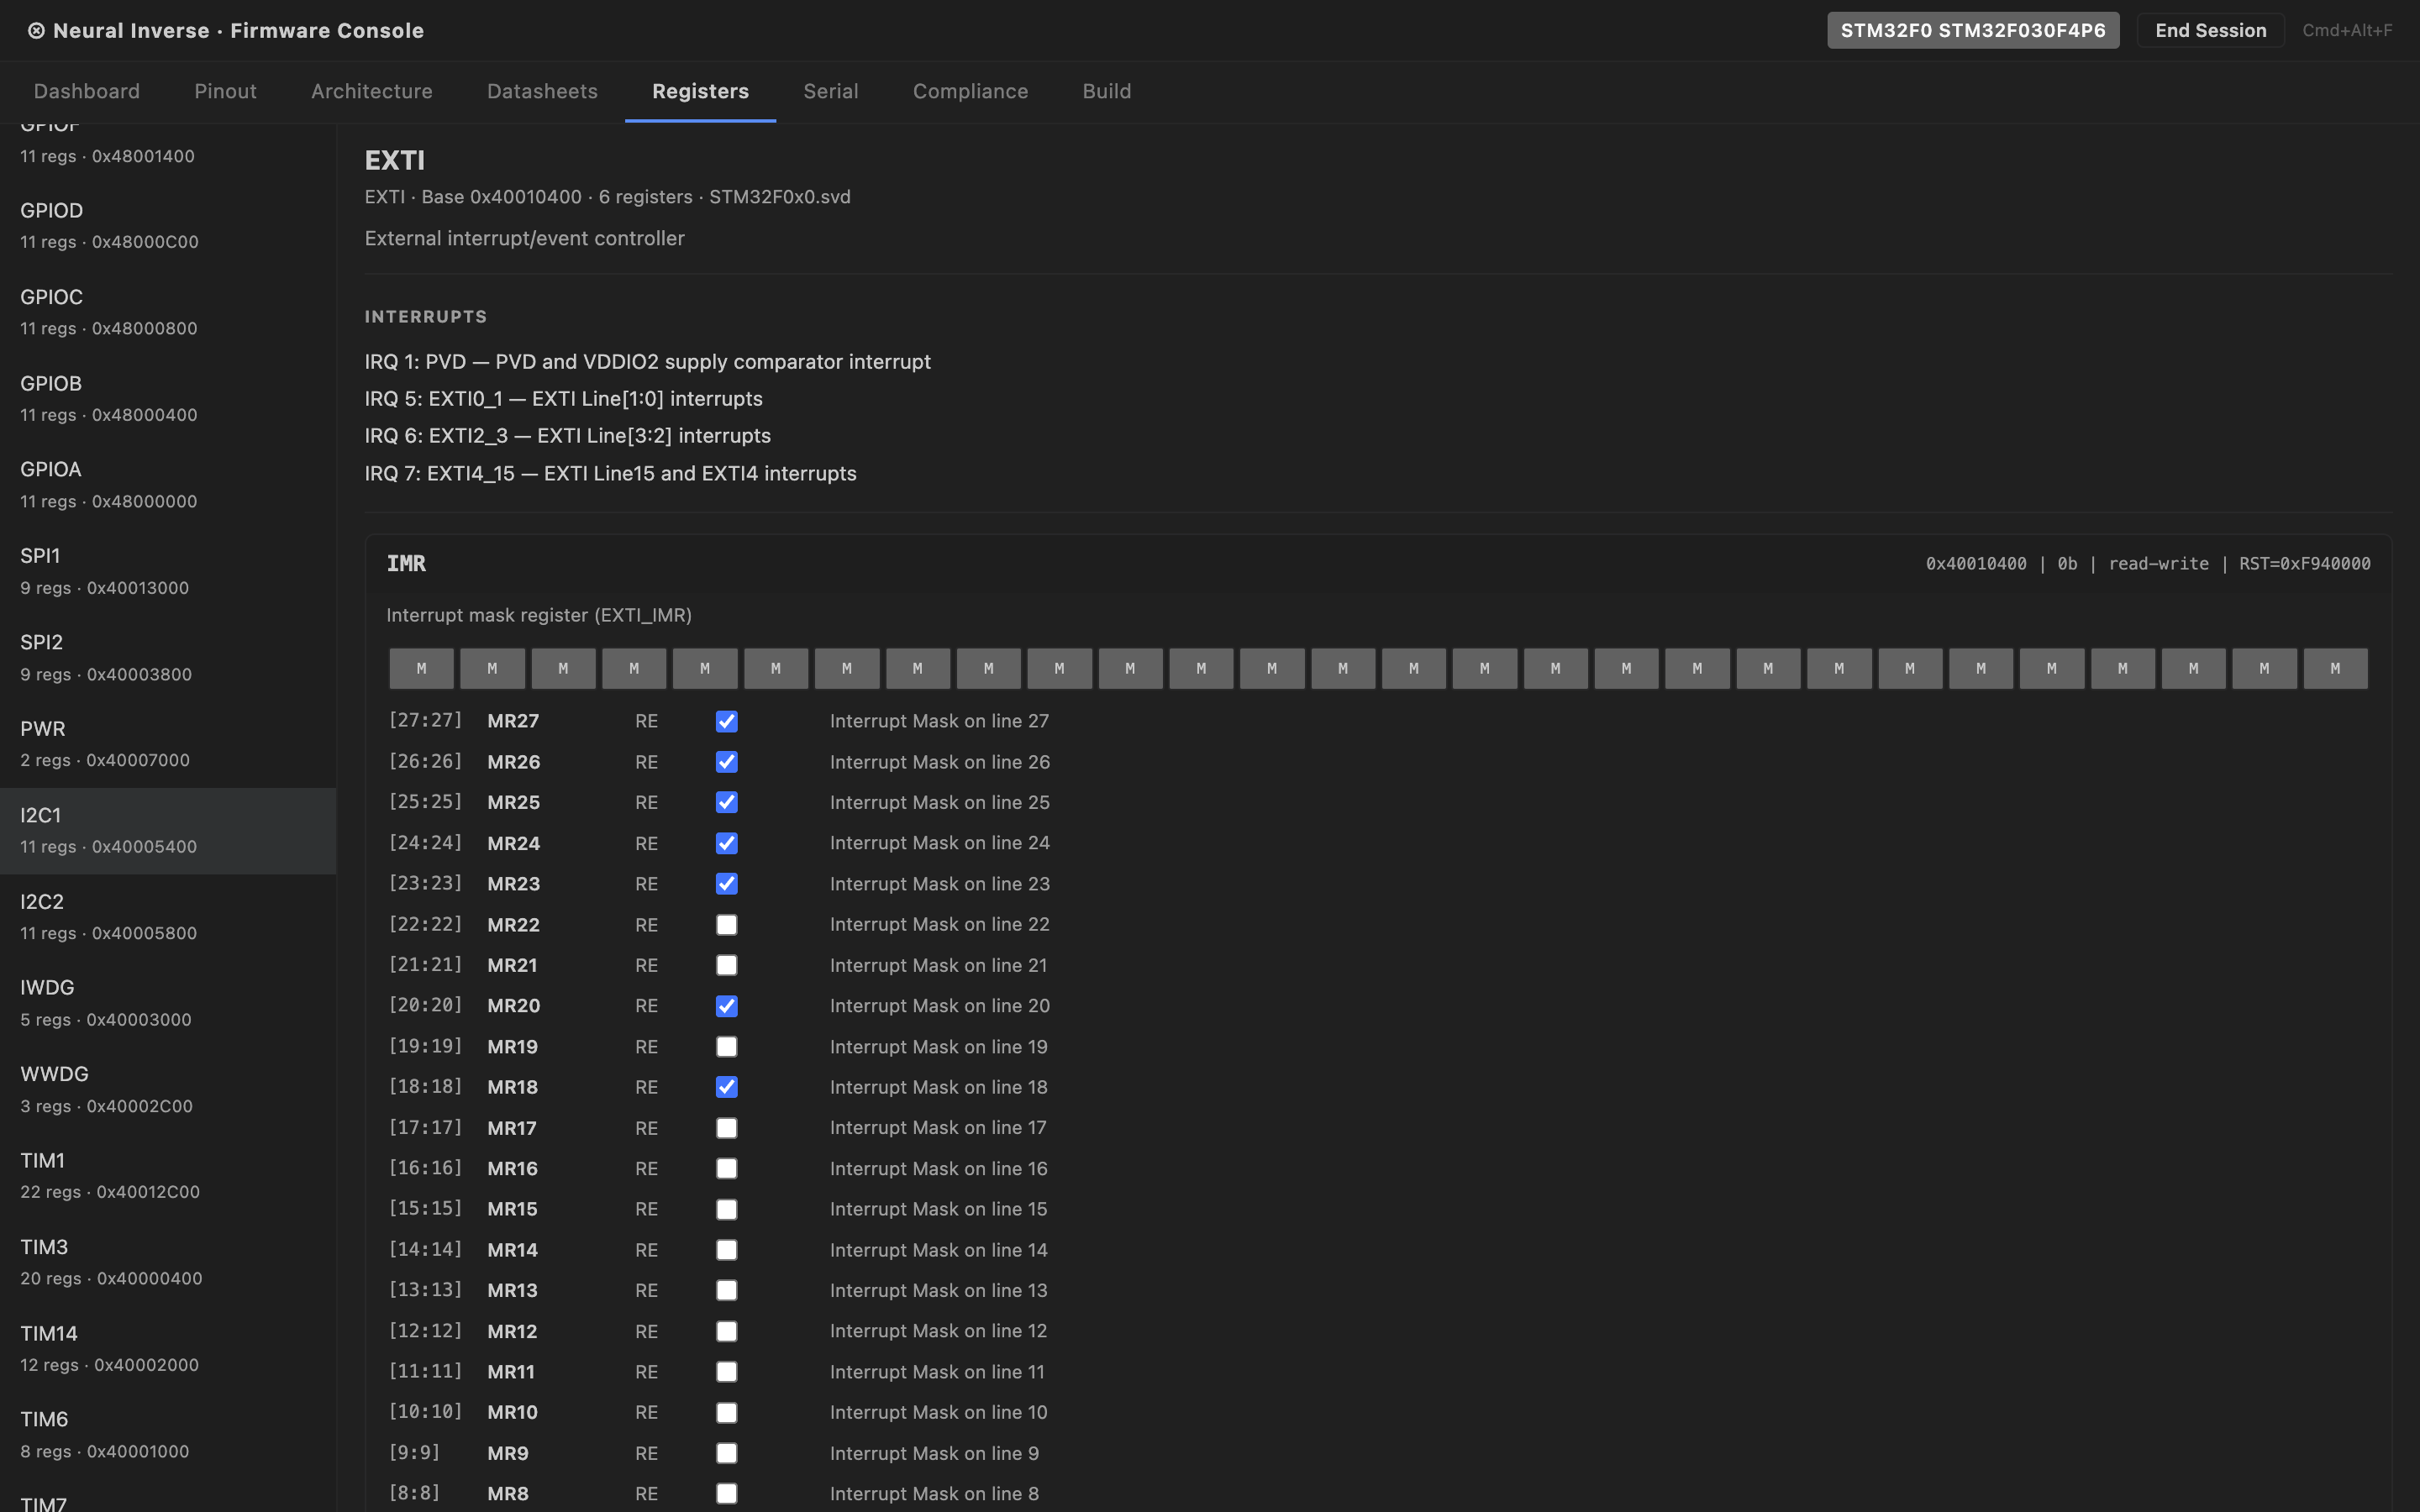
SVD register maps
The Registers tab shows an interactive peripheral register tree populated from CMSIS-SVD data.
Expand any peripheral to see its registers, and expand a register to see all bit fields with their names,
access type, reset value, and description.
Bundled SVDs load instantly without a network fetch:
- STM32F4, STM32F7, STM32H7, STM32L4, STM32G4
- nRF52840, ESP32, RP2040
For other parts, the SVD auto-fetcher pulls from the posborne/cmsis-svd repository and
caches in memory for the session. Hover over any register access in the editor and a tooltip shows the
SVD description, reset value, access type, and bit field breakdown inline.
Datasheet intelligence
Drag any MCU PDF datasheet or reference manual into the Datasheets tab to extract and
index it. The extraction pipeline has three tiers:
- Tier 1 — PDF parser — custom FlateDecode decompressor runs in-process. No external
dependency, no network call. Extracts raw text and tables from every page.
- Tier 2 — Heuristic classifier — classifies each page by type with zero LLM calls:
registers, timing tables, errata, pinout, memory map, electrical characteristics, block diagrams.
- Tier 3 — LLM reclassifier — runs on ambiguous pages only, capped at 150 pages per
document. If a part number is identified in the PDF, the authoritative SVD is fetched and used
instead of heuristic register extraction.
A 400-page reference manual processes in approximately 10 seconds on first open. Results
are content-hash cached in .inverse/hardware-kb/ at the workspace root.
Re-opening the same PDF costs zero LLM calls. The cache is shareable — commit the directory to give
your team pre-processed datasheets.
Part number mismatch
If the part number identified in the PDF does not match the active MCU session, a warning badge appears
in the Datasheets tab. The datasheet is still usable but the mismatch is flagged.
Build, Flash & Size Analysis
The Build tab detects your project type and presents the appropriate build command. Nine
project types are supported:
- PlatformIO, CMake, Make, ESP-IDF, Cargo (Rust embedded), Arduino CLI, Zephyr, STM32CubeIDE, Mbed
Build output is parsed by the GCC diagnostic parser — errors and warnings are mapped to
file, line, column, and severity, and surfaced as IDE diagnostics with clickable locations.
After a successful build, the Size Analysis panel shows a breakdown of text, data, and bss
sections with Flash and RAM usage displayed as percentage gauges against the MCU's memory spec.
Flash supports 11 tools: openocd, stm32-programmer-cli, st-flash, esptool, nrfjprog,
jlink, pyocd, probe-rs, dfu-util, arduino-cli, west. The active flash tool is auto-detected from
your project type and can be overridden in the Flash tab.
Serial Monitor
The Serial tab provides a full serial monitor using the Web Serial API. Features:
- Port enumeration — lists all available serial ports including debug probes.
Auto-detects ST-Link, J-Link, CMSIS-DAP, FTDI, CP210x, CH340, and others.
- Ring buffer — 10,000-line RX/TX buffer with timestamps on every line.
- Baud rate — auto-detection heuristic plus manual override. DTR/RTS signal
control for bootloader auto-reset (used on ESP32).
- Log export — export the current buffer as plain text or CSV.
Hardware-in-the-Loop Debug
The Debug tab connects to a GDB server running on your machine and provides a hardware
debug interface without needing a separate debugger GUI. Five GDB server integrations are supported:
OpenOCD, J-Link GDB Server, pyocd, st-util, QEMU.
Available debug operations:
- CPU register read — r0 through r15, sp, lr, pc, xpsr
- Memory read and write at arbitrary addresses
- Breakpoint set and remove by file:line or function name
- Step, step-instruction, continue, halt, reset
Agent tools (fw_*)
When a Firmware session is active, 22 fw_* tools are injected into
Power Mode and the main Agent automatically. They cover:
fw_get_mcu_info | MCU | Returns the active MCU variant, core, flash/RAM sizes, and platform ID. |
fw_list_peripherals | MCU | Lists all peripherals in the active SVD with addresses and descriptions. |
fw_search_mcu_database | MCU | Fuzzy-searches the 357-variant MCU database by part number, family, or keyword. |
fw_get_register_map | Registers | Returns the full register map for a named peripheral with bit field details. |
fw_get_peripheral_config | Registers | Returns the current configuration of a peripheral derived from SVD reset values. |
fw_get_clock_config | Registers | Returns the clock tree configuration for the active MCU. |
fw_upload_datasheet | Datasheets | Triggers extraction of a PDF datasheet by path. |
fw_query_datasheet | Datasheets | Semantic search across all loaded datasheets. |
fw_get_errata | Datasheets | Returns all errata items from loaded datasheets. |
fw_check_silicon_bug | Datasheets | Checks if a described behaviour matches a known silicon errata. |
fw_get_timing_constraints | Datasheets | Returns timing tables for a named peripheral or signal. |
fw_build_project | Build | Runs the build command for the detected project type. |
fw_flash_device | Build | Flashes the built binary to the connected device. |
fw_binary_analysis | Build | Returns section sizes and Flash/RAM usage percentages. |
fw_read_serial | Serial | Returns the latest N lines from the serial ring buffer. |
fw_write_serial | Serial | Sends a string to the serial port. |
fw_start_debug_session | Debug | Starts a GDB server connection. |
fw_send_gdb_command | Debug | Sends a raw GDB command and returns the response. |
fw_read_cpu_registers | Debug | Returns all CPU register values. |
fw_read_memory | Debug | Reads memory at a given address and length. |
fw_write_memory | Debug | Writes bytes to a given memory address. |
fw_set_breakpoint | Debug | Sets a breakpoint by file:line or function name. |
Compliance frameworks
Active frameworks are shown in the Compliance tab and in the IDE status bar. The following
frameworks are supported:
- MISRA C:2012 / MISRA C:2023 — embedded C coding standard
- CERT C — secure coding standard for C
- IEC 62304 — medical device software lifecycle
- ISO 26262 — automotive functional safety
- DO-178C — airborne software certification
- IEC 61508 — industrial functional safety
- AUTOSAR — automotive software architecture standard
Platform knowledge packs
Four built-in knowledge packs inject platform-specific guidance into every AI interaction
when the corresponding MCU is active:
- STM32 — RCC clock enable patterns, GPIO alternate function tables, HAL vs LL guidance,
FLASH wait state rules, DMA stream/channel patterns.
- ESP32 — ESP-IDF task model, FreeRTOS core affinity, ADC2/WiFi conflict,
IRAM_ATTR placement, menuconfig navigation.
- nRF (Nordic) — Zephyr west build, EasyDMA RAM buffer requirements, HFXO for BLE,
devicetree pin assignment.
- RP2040 / RP2350 — dual-core patterns, PIO state machine authoring, QSPI XIP
constraints, USB 48 MHz clock requirement.
Firmware.inverse manifest
Place a Firmware.inverse file at the workspace root to pin the
session configuration. When present, NeuralInverse always scores confidence 1.0 and loads the session
without prompting. The file is shareable — committing it to the repository means every team member
opens with the same MCU, datasheets, and compliance frameworks pre-loaded.
Firmware.inverse example
{
"mcu": "STM32F407VGT6",
"board": "STM32F4-Discovery",
"rtos": "FreeRTOS",
"buildSystem": "cmake",
"complianceFrameworks": ["MISRA-C:2012"],
"datasheetPaths": [".inverse/hardware-kb/stm32f407-rm.pdf"],
"svdPath": ".inverse/STM32F407.svd"
}
Features
MCP Servers
Model Context Protocol servers extend the AI with custom tools. Any MCP server you configure locally
becomes available in Chat, Power Mode, and Agents — alongside built-in and Firmware tools.
Adding a server
Open NeuralInverse Settings and go to the MCP tab. Click
Add Server. Two transport types are supported:
stdio
The IDE spawns the MCP server as a child process and communicates over stdin/stdout.
Most local MCP servers use this transport.
Example — filesystem server
{
"name": "filesystem",
"transport": "stdio",
"command": "npx",
"args": ["-y", "@modelcontextprotocol/server-filesystem", "/Users/you/projects"]
}
SSE
The IDE connects to a running MCP server over HTTP Server-Sent Events. Use this for
remote servers or servers that manage their own lifecycle.
Example — remote server
{
"name": "my-api-tools",
"transport": "sse",
"url": "http://localhost:8080/sse"
}
Using MCP tools
Once configured, MCP tools appear in the tool list available to Chat, Power Mode,
and Agents. No further setup is needed. The AI calls them the same way it calls built-in tools —
transparently, when the task requires it. In Power Mode you can see the exact tool name and arguments
rendered inline as each call happens.
Tool conflicts
If an MCP tool has the same name as a built-in tool, the built-in takes precedence. Rename
conflicting tools in the server config to avoid shadowing.
Reference
Keyboard Shortcuts
All NeuralInverse CE shortcuts. macOS uses Cmd where
Windows and Linux use Ctrl.
AI Features
| Open Chat | Cmd+L / Ctrl+L |
| Open Power Mode | Cmd+P / Ctrl+P |
| Open Agents | Cmd+Alt+A / Ctrl+Alt+A |
| Open Modernisation | Cmd+Alt+M / Ctrl+Alt+M |
| Open Firmware | Cmd+Alt+F / Ctrl+Alt+F |
| Inline AI on selected code | Cmd+K / Ctrl+K |
| Accept autocomplete suggestion | Tab |
| Dismiss autocomplete suggestion | Esc |
Editor
| Command Palette | Cmd+Shift+P / Ctrl+Shift+P |
| Settings | Cmd+, / Ctrl+, |
| Quick Open File | Cmd+P / Ctrl+P |
| Find in Files | Cmd+Shift+F / Ctrl+Shift+F |
| Toggle Terminal | Cmd+` / Ctrl+` |
| Toggle Sidebar | Cmd+B / Ctrl+B |
| Split Editor | Cmd+\ / Ctrl+\ |
| Go to Definition | F12 |
| Rename Symbol | F2 |
Reference
.neuralinverseagent
A JSON configuration file placed at the workspace root. It lets you tune agent behavior per project —
approval tiers, blocked commands, iteration limits, and sub-agent concurrency. All fields are optional;
omitted fields use global IDE defaults.
Full schema
{
// Approval tier per action type
"tiers": {
"terminal": "ask", // "auto" | "ask" | "block"
"fileEdits": "auto", // "auto" | "ask" | "block"
"browser": "ask" // "auto" | "ask" | "block"
},
// Commands the agent is never allowed to run
"blockedCommands": [
"rm -rf",
"git push --force",
"git reset --hard"
],
// Maximum agent loop iterations per task (default: 40)
"maxIterations": 40,
// Maximum sub-agents running at once (default: 3)
"maxConcurrentSubAgents": 3
}
Field reference
tiers.terminal |
string |
Approval mode for terminal commands the agent wants to run. auto executes immediately. ask shows a confirmation prompt with the full command before running. block prevents all terminal access. |
tiers.fileEdits |
string |
Approval mode for file writes, edits, and deletions. Same three values as above. Defaults to ask globally. |
tiers.browser |
string |
Approval mode for browser navigation and interaction. Defaults to ask globally. |
blockedCommands |
string[] |
Array of command substrings. If any running command contains a blocked substring, the agent refuses to execute it regardless of the terminal tier setting. Matching is case-sensitive substring search. |
maxIterations |
number |
Maximum number of agent loop iterations for a single task. The agent stops and asks for guidance when this limit is reached. Prevents runaway loops on ambiguous tasks. Default: 40. |
maxConcurrentSubAgents |
number |
Maximum number of sub-agents (Explorer, Editor, Verifier) running in parallel at any time. Additional sub-agents queue until capacity is available. Default: 3. |
Scope
Settings in .neuralinverseagent apply only to the workspace where the file lives.
They override the global IDE settings for that project only. You can commit this file to version
control so the whole team uses the same agent policy.